I have been using Spring framework to build my own projects for several time. In order to have a deeper understanding of how Spring framework works and the core concepts of Spring framework ( i.e Inversion of Control , dependency injection…) I decide to implements a mini-spring framework. So that, it can works with basic requirement such as response to the HTTP request.
1. Prepared Work
1.1 Requirement analysis, To achieve basic of Spring Framework, we need to analysis which parts should we implements.
Spring Core Module, includes core(core is the utility package to support spring framework ), beans(bean factory for managing the life cycle of Spring project) and context(context is the interfaces package to interact with clients).
Spring Web Module ( Integrate Application Server(Tomcat) as the container for Servlet ) And Spring MVC
Spring-starter, Starter the application like Spring-boot-starter.
1.2 Build our project
Here ,I use gradle instead of maven as the project management tool because of the high performance of gradle. It is also more convenient than maven.
This is the project structure of our Spring project. By the way, I use IntelligentJ IDEA as the dev tool.
We will have two modules in our project. One is the framework module and the other one is test module. Framework module is to implements our Spring Framework Project. Test Module is how the client could use our mini spring framework.
├───.gradle
│   ├───4.10.3
│   │   ├───fileChanges
│   │   ├───fileHashes
│   │   ├───taskHistory
│   │   └───vcsMetadata-1
│   ├───buildOutputCleanup
│   └───vcs-1
├───.idea
│   └───modules
├───framework
│   └───src
│       ├───main
│       │   ├───java
│       │   │   └───com
│       │   │       └───example
│       │   │           └───tan
│       │   │               ├───beans
│       │   │               ├───context
│       │   │               ├───core
│       │   │               ├───starter
│       │   │               └───web
│       │   └───resources
│       └───test
│           ├───java
│           └───resources
├───gradle
│   └───wrapper
└───test
    └───src
        ├───main
        │   ├───java
        │   └───resources
        └───test
            ├───java
            └───resources
In the text file ,we will have the starter class which is the entry point of our project. run the following command to see if our project works
grandle build
java -jar test/build/libs/test-1.0-SNAPSHOT.jar
An error occurs
no main manifest attribute, in test/build/libs/test-1.0-SNAPSHOT.jarWhat we need to do is to add manifest attribute regarding to the jar pacakge.
In the build.grandle file in the text module , we should point out the Main-Class of our application and as the same time compile all the jars related to it recursively.
jar{
    manifest{
        attributes "Main-Class":"com.example.tan.Application"
    }
    from{
        configurations.compile.collect{
            it.isDirectory() ? it: zipTree(it)
        }
    }
}
How to connect framework module to our test module.
First thing is when compiling the text module, it should compile the framework as well.
Add framework module to dependencies of text module
dependencies {
    testCompile group: 'junit', name: 'junit', version: '4.12'
    compile(project(':framework'))
}
Create a Starter class for the framework.
package com.example.tan.starter;

/**
 * This is the starter of our Mini Spring Framework.
 * It has run method takes two argument. The first one is the
 * Class Object of the client, so the framework can get the Application class information
 *
 */
public class MiniApplication {
    public static void run(Class<?> cls, String[] args){
        System.out.println("Hello, Mini Spring Framework");
    }
}
In test client, we could invoke that method
public class Application {
    public static void main(String[] args) {
        System.out.println("hello world");
        MiniApplication.run(Application.class,args);
    }
}
Package and run the jar file
$ gradle build
$ java -jar test/build/libs/test-1.0-SNAPSHOT.jar

hello world
Hello, Mini Spring Framework
Until Now, our project could start and run. In the next section, we will integrate the web Server.
2. Integrate Web Container.
Web Server usually listen to a TCP port, dispatch request to php, python scripts (for Ngnix Server) Or Java code (for Tomcat Server) and collect response. Web Server has no responsibility to deal with the business logic. It provides connection for operating system and application codes to improve performance.
Having knowing the mechanism of Web Server, now let us integrate the most popular web server in java, which is tomcat. From Tomcat 7, it could be embedded to our program.
Here, I choose Tomcat [8.5.34] (https://mvnrepository.com/artifact/org.apache.tomcat.embed/tomcat-embed-core/8.5.34)
First, add dependency to the framework module
dependencies {
    testCompile group: 'junit', name: 'junit', version: '4.12'
    // https://mvnrepository.com/artifact/org.apache.tomcat.embed/tomcat-embed-core
    compile group: 'org.apache.tomcat.embed', name: 'tomcat-embed-core', version: '8.5.34'
}
Second, implements the class for starting the Tomcat Server.
package com.example.tan.web.server;
import org.apache.catalina.LifecycleException;
import org.apache.catalina.startup.Tomcat;

/**
 * This class is for starting the embed Tomcat Server
 */
public class TomcatServer {

    private Tomcat tomcat;
    private String[] args; // TODO: arguments for start the tomcat server


    public TomcatServer(String[] args){
        this.args = args;
    }

    public void startServer() throws LifecycleException {

        tomcat = new Tomcat();
        tomcat.setPort(8080); // set listening port
        tomcat.start();

        // Create await thread by anomoynous inner class
        Thread awaitThread = new Thread("tomcat_await_thread"){
            @Override
            public void run(){
                TomcatServer.this.tomcat.getServer().await();
            }
        };
        awaitThread.setDaemon(false);
        awaitThread.start();
    }
}
I should mention a key concept here, which is called daemon thread. The official defination of daemon thread is that A daemon thread is a thread that does not prevent the JVM from exiting when the program finishes but the thread is still running. An example for a daemon thread is the garbage collection. from Stack Overflow problem. What is a daemon thread in Java? In other word, the JVM can only halts if and only if all all non-daemon threads finish, and any remaining daemon threads are abandoned at the same time.
The setDaemon(boolean) method is to change the Thread daemon properties before the thread starts. Here, I set the Daemon of awaitThread to be false, means that Although the client terminates, the Tomcat Server continues to run in awaiting state.
Now, we can start the server In MINI Application class.
/**
 * This is the starter of our Mini Spring Framework.
 * It has run method takes two argument. The first one is the
 * Class Object of the client, so the framework can get the Application class information
 *
 */
public class MiniApplication {
    public static void run(Class<?> cls, String[] args){
        System.out.println("Hello, Mini Spring Framework");

        // Start the server when call the method
        TomcatServer tomcatServer = new TomcatServer(args);
        try {
            tomcatServer.startServer();
        } catch (LifecycleException e) {
            e.printStackTrace();
        }
    }
}
Now, since we do not have servlet yet, so it can not have the response. Tomcat Server is the application server, and serlvet runs in that container and defines a way of communication between the application server and the client.Servlet is a interface, each application server like tomcat should implements servlet. So that the servlet client created can deal with Http Request and Http Response.
Here, for testing, create a context cotainer and a text serlvet, add that servlet to the container.
/**
* This class is for starting the embed Tomcat Server
*/
public class TomcatServer {
private Tomcat tomcat;
private String[] args; // TODO: arguments for start the tomcat server
public TomcatServer(String[] args){
this.args = args;
}
public void startServer() throws LifecycleException {
tomcat = new Tomcat();
tomcat.setPort(8080);// set listening port
tomcat.start();
Context context = new StandardContext();
context.setPath("");
context.addLifecycleListener(new Tomcat.FixContextListener()); //add default listener
TestServlet servlet = new TestServlet();
Tomcat.addServlet(context,"testServlet",servlet).setAsyncSupported(true);
context.addServletMappingDecoded("/test.json","testServlet");//add servlet mapping
tomcat.getHost().addChild(context); // add context container to the host container
// Create await thread by anomoynous inner class
Thread awaitThread = new Thread("tomcat_await_thread"){
@Override
public void run(){
TomcatServer.this.tomcat.getServer().await();
}
};
awaitThread.setDaemon(false);
awaitThread.start();
}
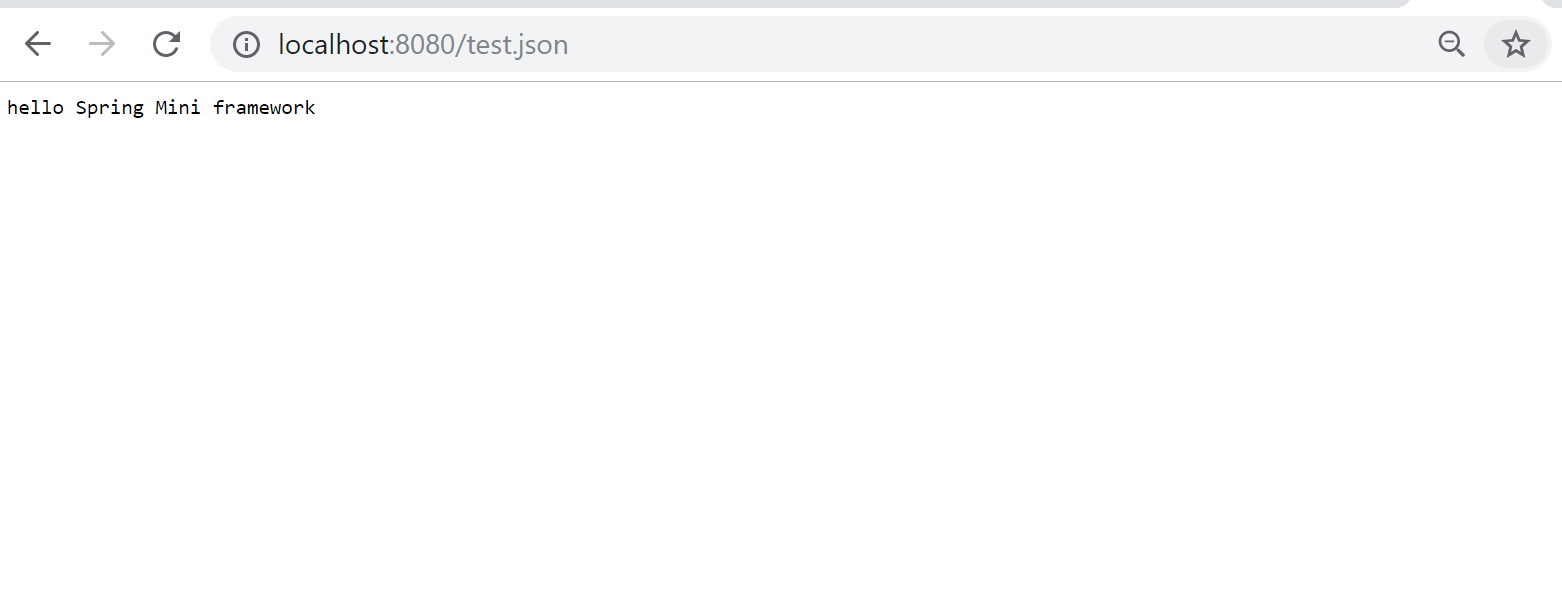
}Build the jar, and rerun it, we could see
3. Implements Controller for maintenance of multiple Servlets
In section 2, the test servlet is hard-coded, which is not what we want.
Traditional J2EE manage serlvets in following ways:
Tomcat server is responsible for dispatching servlets.
The Registration of Servlets are in the web.xml files under the ClassPath folder
Every Service is corresponding to one Servlet class, and it should implements all the Servlet interface.
This way has several disadvantages. First, all the configurations are in the web.xml, which is really complicated. Second, implements all methods of Servlet interface is redundent. Many servlets dealing with business logic only needs the service methods.
How Spring Framework do ?
Spring Has one Dispatcher Servlet for dispatching servlets according to URL Mapping. All the requests should be received by the dispacther servlet in the first place. Servlets in Spring are simplied as Mapping Handler. It uses @RequestMapping annotation to indicate that this class is a controller.
Using annotation is quite easy.
Therefore, What we need to do right now is a Dispatcher Serlvet and a set of Annotations.
Controller Annotation,
@Documented
@Retention(RetentionPolicy.RUNTIME)
@Target(ElementType.TYPE)
public @interface Controller {

}
In jdk 5.0, java defines 4 meta-annotation types, which are
1.@Target,
2.@Retention,
3.@Documented,
4.@Inherited
I will introduce them one by one, since it has been used quite frequently.
@Target: @Target describes the types of element annotation can be decorated. ElementTypes have following
values:
1.CONSTRUCTOR
2.FIELD
3.LOCAL_VARIABLE
4.METHOD
5.PACKAGE
6.PARAMETER
7.TYPE: includes Class, Interface Enum.
@Retention : @Retention describes the annotations exists times(lifecyle of the annotation ), Some annotations are ignored in complie stage, some annotations are not accepted by the ClassLoader,the others can be loaded in to JVM so they are valid in Runtime.
Those three stages corresponding to three Retention Poicy which are 1.SOURCE, 2.CLASS, 3.RUNTIME.
@Documented: can be instanciated by the documentation tools like javadoc.
@Inherited : This is a annotation for annotations.It means that subclasses of annotated classes are considered having the same annotation as their superclass.
All these annotations should be valid during runtime.
@RequestMapping should have url as the value and @RequestParam should have the parameter name as the value.
@Documented
@Retention(RetentionPolicy.RUNTIME)
@Target(ElementType.METHOD)
public @interface RequestMapping {
    String value();
}
@Documented
@Retention(RetentionPolicy.RUNTIME)
@Target(ElementType.PARAMETER)
public @interface RequestParam {
String value();
}Having annotations is not enougth, we should also tell the spring framework about classes using those annotations.ClassLoader is responsible for accomplishing this task.
What is ClassLoader for ?
- Through ClassName to get the bits stream .
- Parse the stream to get the Class instance.
- it is also responsible for loading the classPath static resources
So, the next challenge would be utilize classloader to get the classes given the package name.
Attached is the detailed utility classes for loading the classes under the packages
/**
 * Scan all the classes
 */
public class ClassScanner {

    /**
     * Select jar resources and get all classes under the jar resources
     * @param packageName
     * @return
     * @throws IOException
     * @throws ClassNotFoundException
     */
    public static List<Class<?>> scanClasses(String packageName) throws IOException, ClassNotFoundException {
        List<Class<?>> classList = new ArrayList<>();
        String path = packageName.replace(".","/");
        ClassLoader classLoader = Thread.currentThread().getContextClassLoader();
        Enumeration<URL> resources = classLoader.getResources(path);
        while (resources.hasMoreElements()){
            URL resource = resources.nextElement();
            if(resource.getProtocol().contains("jar")){
                JarURLConnection jarURLConnection = (JarURLConnection )resource.openConnection();
                String jarFilePath = jarURLConnection.getJarFile().getName();
                classList.addAll(getClassesFromJar(jarFilePath,path));
            }
        }
        return classList;
    }

    /**
     * Get all the CLass objects from the jar file Path
     * @param jarFilePath
     * @param path
     * @return
     * @throws IOException
     * @throws ClassNotFoundException
     */
    private static List<Class<?>> getClassesFromJar(String jarFilePath,String path) throws IOException, ClassNotFoundException {
        List<Class<?>> classes = new ArrayList<>();
        JarFile jarFile = new JarFile(jarFilePath);
        Enumeration<JarEntry> jarEntries = jarFile.entries();
        while(jarEntries.hasMoreElements()){
            JarEntry jarEntry = jarEntries.nextElement();
            String entryName =  jarEntry.getName();  //e.g com/example/tan/Text.class
            if(entryName.startsWith(path) && entryName.endsWith(".class")){
                String classFullName = entryName.replace("/",".").substring(0,entryName.length()-6);
                classes.add(Class.forName(classFullName));
            }
        }
        return classes;
    }
}
Test By the framework package , we can get all the classes with proper names
com.example.tan.Application
com.example.tan.Controller.GradeController
com.example.tan.core.ClassScanner
com.example.tan.starter.MiniApplication
com.example.tan.web.mvc.Controller
com.example.tan.web.mvc.RequestMapping
com.example.tan.web.mvc.RequestParam
com.example.tan.web.server.TomcatServer$1
com.example.tan.web.server.TomcatServer
com.example.tan.web.servlet.DispatcherServlet
Mapping Handler(Using Java Reflection at runtime)
The controller methods are invoked by Mapping Handler where each mapping handler has 4 field, uri, controller class object, method object and arguments in type of String array. The core method in Mapping handler is the handle Method which can execute the controller at run time.
The process of how Spring MVC handles the request is as follows:
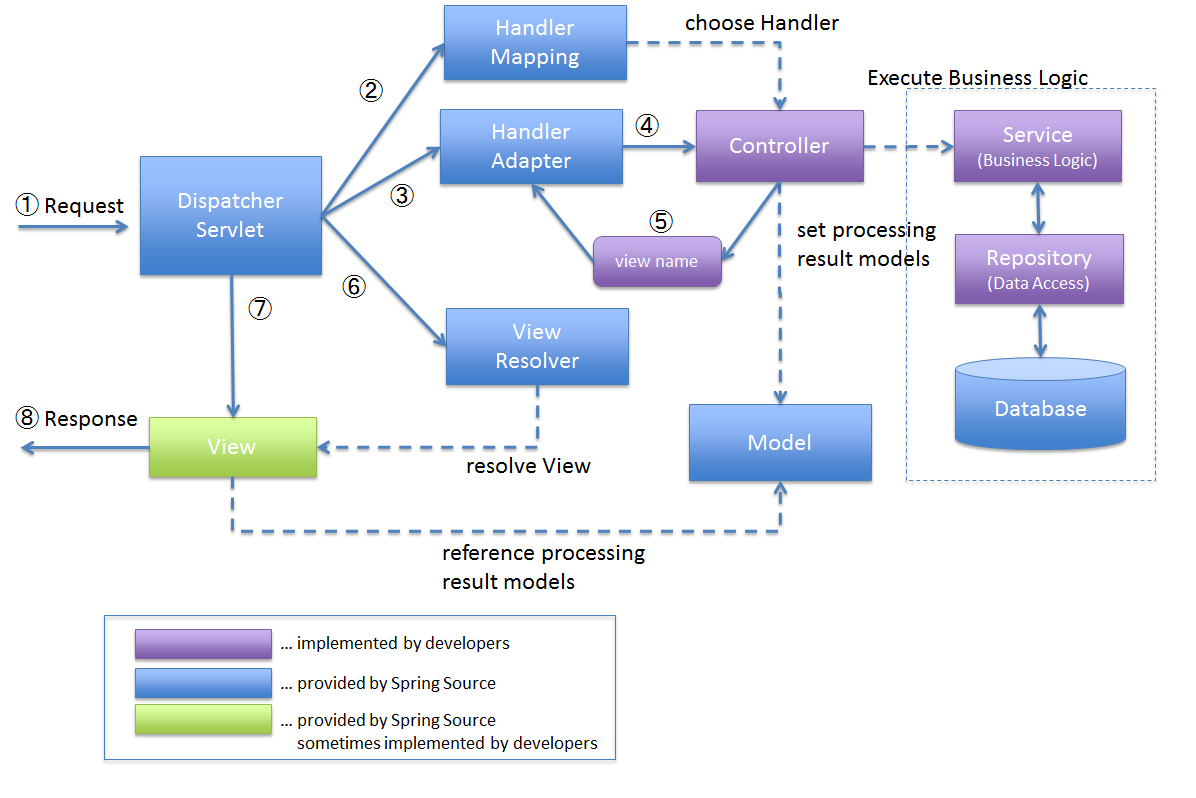
Dispatcher Servlet will choose the Correct Controller to deal with the Handler.How can we do that?
Well, we would have Handler Manager as the container for registering all the controller at runtime to the HandlerManager container. Each Handler in the HandlerManager has a handle method and return boolean value to indicate whether it is the method to handle the request URI. If it is the mapping Handler to handle the URI, it will invoke the method with parameters given the class objects.
The HandlerManager container will create one-to-one handler instance for each request URI.
The codes are as follows:
Dispatcher Servlet implements the Servlet interface and override handle method
public class DispatcherServlet implements Servlet {
    @Override
    public void init(ServletConfig config) throws ServletException {

    }

    @Override
    public ServletConfig getServletConfig() {
        return null;
    }

    @Override
    public void service(ServletRequest request, ServletResponse response) throws ServletException, IOException {
        HandlerManager.mappingHandlerList.forEach(handler ->{
            try {
                if(handler.handle(request,response)){
                    return ;
                }
            } catch (IllegalAccessException e) {
                e.printStackTrace();
            } catch (InstantiationException e) {
                e.printStackTrace();
            } catch (InvocationTargetException e) {
                e.printStackTrace();
            } catch (IOException e) {
                e.printStackTrace();
            }
        });
    }

    @Override
    public String getServletInfo() {
        return null;
    }

    @Override
    public void destroy() {

    }
}
HandlerManager.
/**
 * Container for All Handler Manager
 */
public class HandlerManager {

    public static List<MappingHandler> mappingHandlerList = new ArrayList<>();

    public static void resolveMappingHandler(List<Class<?>> classList){
        classList.forEach(cls -> {
            // if the class has the annotation Controller, create the Mapping Handler Instance
            // and add to the container - MappingHandlerList
            if(cls.isAnnotationPresent(Controller.class)){
                parseHandlerFromController(cls);
            }
        });
    }

    private static void parseHandlerFromController(Class<?> cls){
        Method[] methods = cls.getDeclaredMethods();
        for(Method method: methods){
            if(!method.isAnnotationPresent(RequestMapping.class)){
                continue;
            }
            // Get the request URI  by @RequestMapping
            String uri = method.getDeclaredAnnotation(RequestMapping.class).value();
            // Get the parameters list with annotation @RequestParam
            List<String> paramNameList = new ArrayList<>();
            for(Parameter parameter:method.getParameters()){
                if(!parameter.isAnnotationPresent(RequestParam.class)){
                    paramNameList.add(parameter.getDeclaredAnnotation(RequestParam.class).value());
                }
            }
            // convert into  array of String
            String[] params = paramNameList.toArray(new String[paramNameList.size()]);

            // register the mappingHandler in HandlerManager
            MappingHandler mappingHandler = new MappingHandler(uri, method, cls, params);

            HandlerManager.mappingHandlerList.add(mappingHandler);
        }
    }
}
Mapping Handler
/**
 * Handle the URI request Mapping to invoke the method in Controller at run time.
 */
public class MappingHandler {

    private String uri; //reqeust URI


    private Class<?> controller; // controller

    private Method method; // method needed to be execute in the Mapping Handler

    private String[] args; // args for that method.

    public MappingHandler(String uri, Method method, Class<?> controller, String[] args) {
        this.uri = uri;
        this.method = method;
        this.controller = controller;
        this.args = args;
    }

    /**
     * 1. Verify the Mapping Handler can deal with the request or not.
     *
     * 2. Get the parameters values from the request.
     *
     * 3.Create the Controller object by reflection and invoke the method with parameters.
     *
     * 4. Write the response to ServletResponse  and return true;
     *
     * @param request
     * @param response
     * @return
     */
    public boolean handle(ServletRequest  request, ServletResponse response) throws IllegalAccessException, InstantiationException, InvocationTargetException, IOException {
        String requestUri = ((HttpServletRequest)request).getRequestURI();
        if(!requestUri.equals(this.uri)){
            return false;
        }

        Object[] parameters =  new Object[args.length];
        for(int idx = 0; idx < args.length; idx++){
            parameters[idx] = request.getParameter(args[idx]);
        }
        Object controller = this.controller.newInstance();

        Object res = this.method.invoke(controller, parameters);
        response.getWriter().println(res);
        return true;
    }
}
Finally, Don’t forget to scan all the class objects and register all the controller handler mapping to the HandlerManager when starting the application.
public class MiniApplication {
    public static void run(Class<?> cls, String[] args){
        System.out.println("Hello, Mini Spring Framework");

        // Start the server when call the method
        TomcatServer tomcatServer = new TomcatServer(args);
        try {
            tomcatServer.startServer();
            List<Class<?>> classList = ClassScanner.scanClasses(cls.getPackage().getName());
            // print the class name (for testing and logging)
            classList.forEach(it -> System.out.println(it.getName()));
            // add all the MappingHandler to the Controller
            HandlerManager.resolveMappingHandler(classList);
        } catch (LifecycleException e) {
            e.printStackTrace();
        } catch (IOException e) {
            e.printStackTrace();
        } catch (ClassNotFoundException e) {
            e.printStackTrace();
        }
    }
}
4. Spring Bean Management - Inversion of Control and Dependancy Injection
We have already known and implements a simplied version of Controller and Handler Mapping. We know that Entity Classes and Services, Daos have very complex dependence relationships. This means that creaing one Service may depends on serval other services. Circular Dependencies would occur at that time. Spring Bean and Bean Factory tried to avoid the problem and unify the managements of all the beans lifecyle. Let us dig in.
Inversion of Control & Dependancy Injection
Normally, if one object A has a field which is another object Z , we say A depends on Z. If we want to create an instance of object A, what we should do first is to create one object Z in A. In order to Decouple, What we need is a factory to delegate the responsibility of creating Z and through dependancy injection to set the property in A.
First, we definitely need anotations, simply @Bean and @Autowired in our mini spring mvc.
@Documented
@Retention(RetentionPolicy.RUNTIME)
@Target(ElementType.FIELD)
public @interface Autowired {
}
@Documented
@Retention(RetentionPolicy.RUNTIME)
@Target(ElementType.TYPE)
public @interface Bean {
}Bean Factory has the responsibilities to store all the beans and has getBean() and init() method to aquire and create beans. Since beans can be aquired by serval Threads, using thread-safe ConcurrentHashMap would be a better option.
public class BeanFactory {

    //Mapping from Class object to Bean Object
    private static Map<Class<?>,Object> classToBean = new ConcurrentHashMap<>();


    /**
     * Get Bean Object by its class Object.
     * @param cls
     * @return
     */
    public static Object getBean(Class<?> cls){
        return classToBean.getOrDefault(cls,null);
    }

    /**
     * Init Bean,
     * Create those beans which are independent first, and then create beans after there dependencies have been   created
     * @param classList
     * @throws Exception
     */
    public static void initBean(List<Class<?>> classList) throws Exception {
        List<Class<?>> toCreate = new ArrayList<>(classList);

        while(toCreate.size() != 0){
            int remainSize = toCreate.size();
            for(int idx = 0;  idx < toCreate.size() ; idx++){
                if(finishCreate(toCreate.get(idx))){
                    toCreate.remove(idx);
                }
            }
            if(toCreate.size() == remainSize){
                throw new Exception("dependency Cycle!");
            }
        }
    }

    /**
     * 1. If the Class is annotated by @Bean of @Controller,
     *    create an instance and register it in the bean factory.
     *
     * 2. If the bean has some fields which are @Autowired.
     *    If its dependent bean has been created, we can create the bean and put it into the Map.
     *    Otherwise, don't put the bean into the map. instead, create the dependent bean first
     *
     * @param cls
     * @return
     * @throws IllegalAccessException
     * @throws InstantiationException
     */
    private static  boolean finishCreate(Class<?> cls) throws IllegalAccessException, InstantiationException {
        // could be even more, like @Serivce, @Repository @Component ...
        if(!cls.isAnnotationPresent(Bean.class) && ! cls.isAnnotationPresent(Controller.class)){
            return true ;
        }
        Object bean = cls.newInstance();
        // if the bean class has field which needs to be autowired.(depends on other classes)
        for(Field field : cls.getDeclaredFields()){
            if(field.isAnnotationPresent(Autowired.class)){
                Class<?> fieldType = field.getType();
                Object reliantBean = BeanFactory.getBean(fieldType);
                if(reliantBean == null) return false;
                field.setAccessible(true);
                field.set(bean,reliantBean);
            }
        }
        classToBean.put(cls, bean);
        return true;
    }
}
One Bean may depends on other beans if that bean is autowired with @autowired annotation.
5. Test our framework via Small Application
Here, I generate a grade controller and a grade service as a small demo. Simply get the grade by Student uid and name.
@Controller
public class GradeController {

    @Autowired
    private GradeService gradeService;

    @RequestMapping("/get_grade.do")
    public Integer getGrade(@RequestParam(value = "name") String name, @RequestParam(value = "uid") String uid){
        return gradeService.calGrade(Integer.parseInt(uid));
    }

}
@Bean
public class GradeService {

    public Integer calGrade(Integer uid){
        if(uid == 1) return 100;
        else if(uid == 2) return 90;
        else return 70;
    }

}
Test the result via PostMan API.
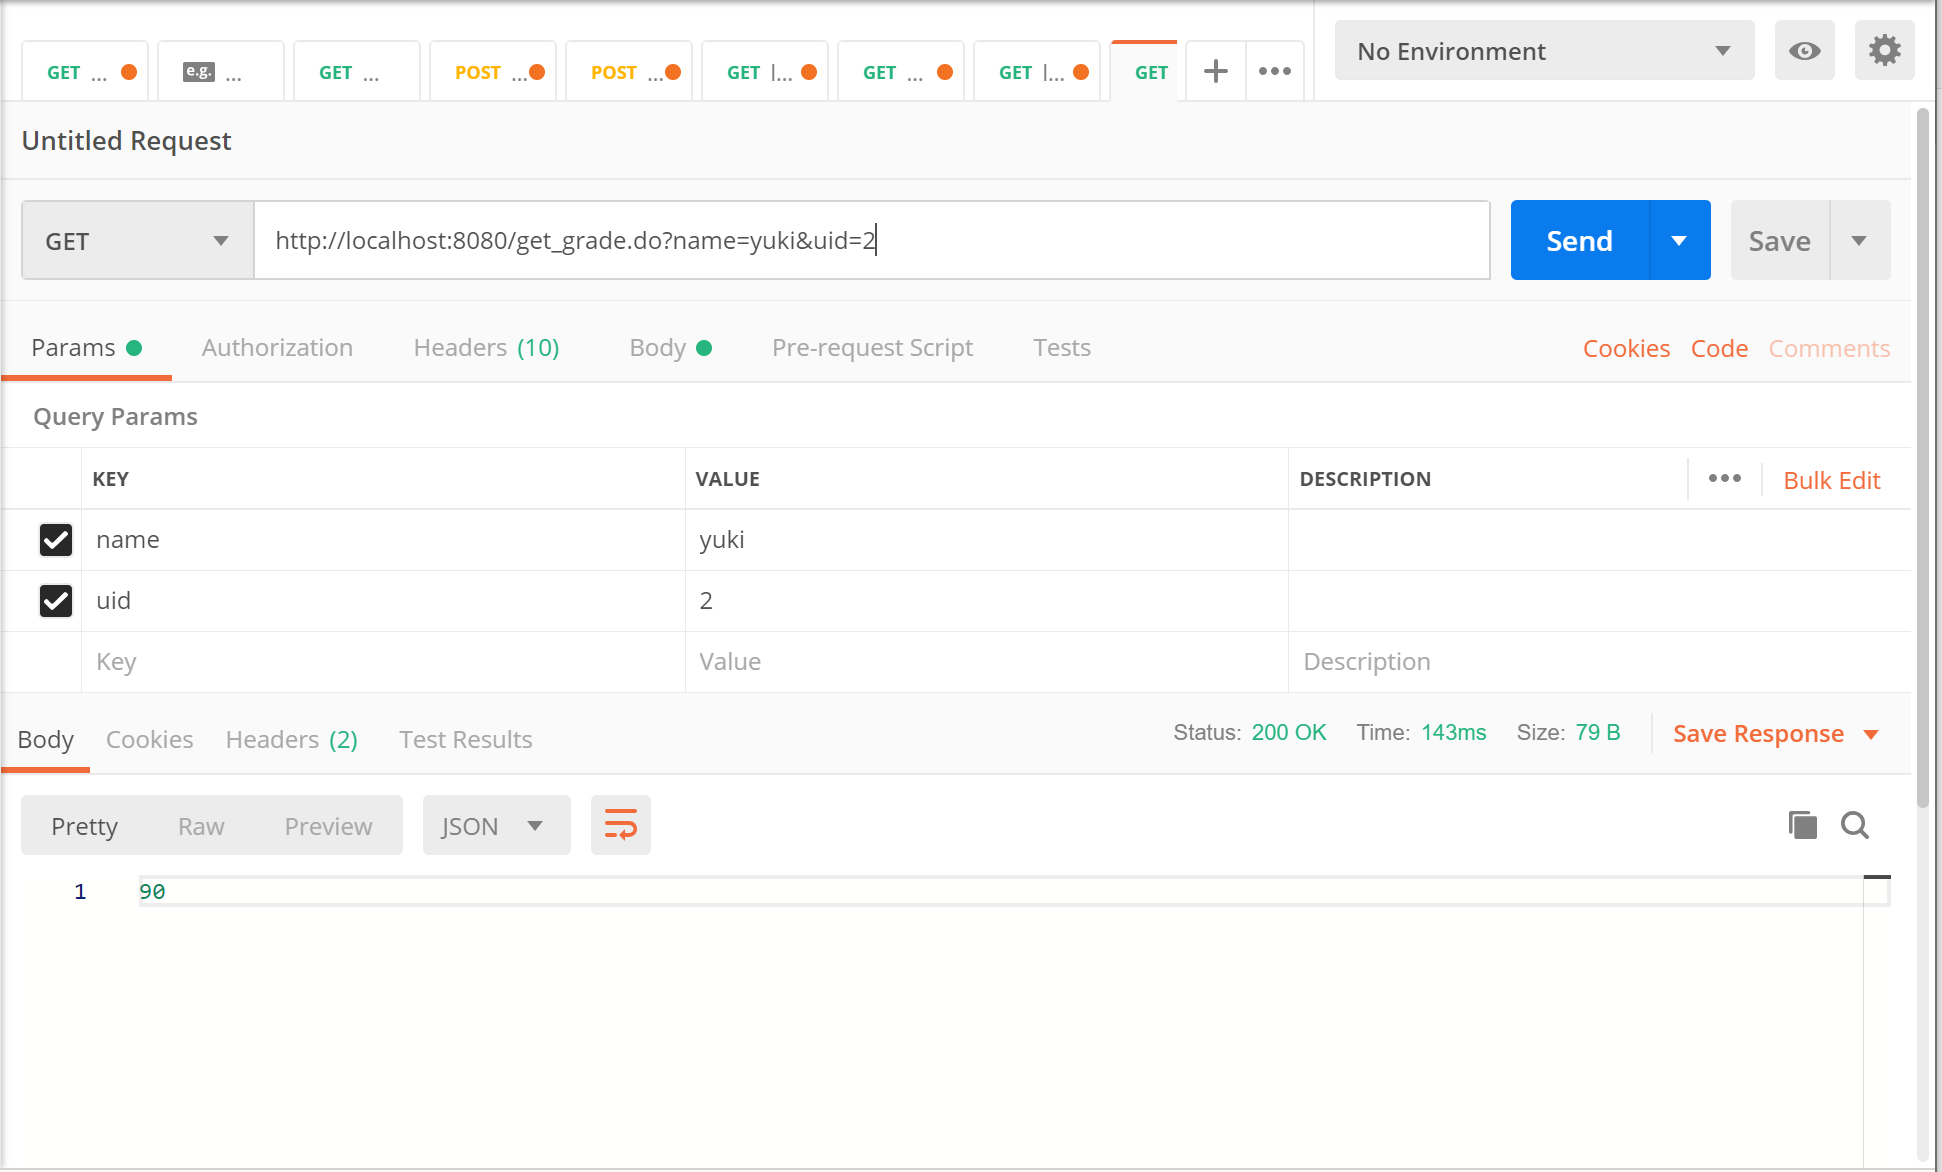
Great, the result is as expected. Here, we have implements the basic of Spring MVC (annotation-based).
There are lot of things to be improved, like the Exceptions check, XML-based bean registration, Cache-mechanism , new features like view resolver, Spring AOP, so on and so forth.